Processing is a programming language aimed at designers and illustrators. It was created at MIT, and it’s actually a subset of the Java language, but with some facilities intended for the production of graphic pieces, animations, interactions, etc.
The advantage of Processing is that it is a very easy language to learn. Like other languages such as JavaScript and Python, even if you have never had any previous programming experience, a few lines of code and a bit of reasoning can produce incredible results. And this has always been its premise since John Maeda and his students at the MIT Media Lab conceived the project in 2001.
I will talk a little about the basics, so you can see if you are also interested in the language, and maybe look for more information.
Getting Started
For starters, you need to download the Processing application. It is free and available for download at http://processing.org. There are versions for Windows, Mac, and Linux. Install it and open it.
This is the main window of Processing. It’s nothing more than a notepad, where you write your code. Up top, there are only play/stop buttons to run and stop your script, and buttons to create a new file, save, open, and export as an application.
To test this, click on Play (or press Ctrl/Cmd+R), and Processing opens a 100 x 100 pixels window, with a gray background. It’s one of the things it does for you, without you having written anything. Great, but we want to have control over this. Close the window to stop the program, and write in the editor:
size(510, 510);
background(#CCCCCC);
The size() function defines the size of the window. If you don’t define this, it’s as if you had written size(100, 100);, as those are the default values of the size() function. In this case, I defined the screen to be 510 x 510 pixels.
The background() function defines the color of the background. In this case, I put a gray in hexadecimal code, but it also accepts red, green, and blue (RGB) values separated by commas. White would be background(255, 255, 255). A single value from 0 to 255 is also a quick way to define shades of gray, with 0 being black and 255 white. Press Play to see if it worked.
The next thing we can do is draw basic shapes on the screen…
size(510, 510);
background(#CCCCCC);
ellipse(200, 100, 120, 60);
rect(200, 200, 80, 80);
line(100, 300, 400, 400);
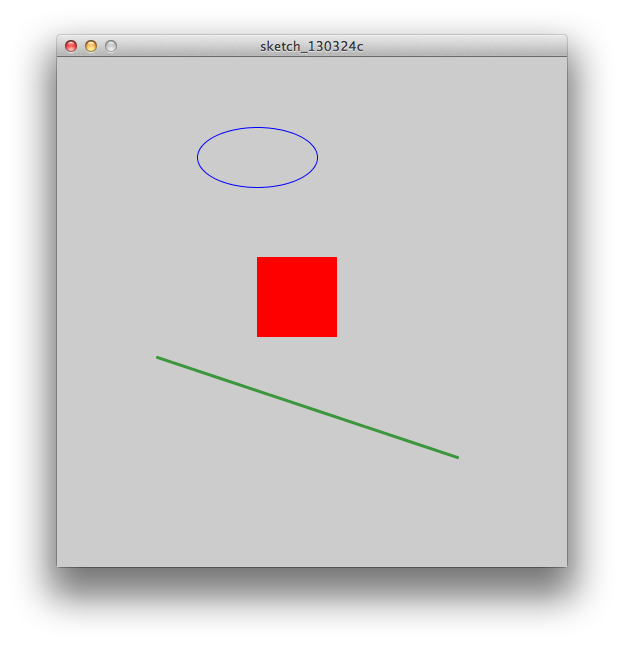
Processing has many functions that create geometric shapes, such as ellipse() (ellipse), rect() (rectangle), and line() (line). Each one has its data input syntax that tells how they will be drawn. These data are the numbers between parentheses.
In the case of the ellipse, we have to inform first where it will be drawn, and then its size. So the translated syntax is ellipse([x coordinate],[y coordinate], [width], [height]). The same applies to drawing the rectangle. The screen coordinates consider the upper left corner as the point (0,0), and everything is in pixels.
A line is basically the connection between two points. So to draw one, just inform the x and y coordinates of those two points. In this case, the line we drew goes from point (100, 300) to point (400, 400).

So far, we haven’t seen anything super exciting, especially with these basic shapes, with white fill and black outline. It would be better to use MS Paint for this!
To improve the appearance we can change the color of the fill and outline…
size(510, 510);
background(#CCCCCC);
noFill();
stroke(0, 0, 255);
ellipse(200, 100, 120, 60);
noStroke();
fill(255, 0, 0);
rect(200, 200, 80, 80);
stroke(60, 150, 60);
strokeWeight(3);
line(100, 300, 400, 400);
What we did here was define, for each shape created, characteristics of fill and outline. The compiler reads the code from top to bottom, and the way it’s written, it finishes the program at the end. So this is basically a list of instructions we are giving it. And note that at the end of each instruction, we need to include a semicolon.
First, we instruct how the size and color of the screen will be. Then we say that the next shape he draws will not have any fill (noFill()) and a blue outline (stroke(0, 0, 255)). Then he draws the ellipse that way, at the defined coordinates and size.
Then we say that the following shape will not have an outline (noStroke()), and the fill will be red (fill(255, 0, 0)). And then he draws the rectangle with those properties, and the coordinates and size also informed.
Lastly, we say that the outline will be green (stroke(60, 150, 60)), with 3 pixels thickness (strokeWeight(3)). And then he draws the line with those properties, at the informed coordinates.
Drawing
So far, we haven’t done anything that MS Paint doesn’t do, so let’s continue, and start to see how we can use these shapes to create drawing tools, and justify more the use of Processing.
To simplify, I’ll work only with an ellipse:
size(510, 510);
background(#333333);
noFill();
stroke(#FFFFFF);
ellipse(255,255,100,100);
Notice that I positioned the ellipse in the center of the screen. To not have to calculate the center, I can take advantage of the pre-declared variables width (width) and height (height), in case I want to change the size of the screen, I don’t have to go back and recalculate the position of the ellipse:
size(510, 510);
background(#333333);
noFill();
stroke(#FFFFFF);
ellipse(width/2,height/2,100,100);
This already shows how Processing offers ready-to-use variables, saving the time of having to create very used variables.
So far, everything we’ve written has been a list of instructions for the compiler, where he reads line by line, and at the end finishes the program. But for there to be any kind of visual change over time, we need some kind of code block that is repeated every frame. For this, we introduce two essential functions, inherent to Processing: setup() and draw().
Basically, the setup() function is run only once, and is used for initial declarations like screen size, background, etc. The draw() function is run in a loop, once per frame. Our code looks like this:
void setup() {
  size(510, 510);
  background(#333333);
  noFill();
  stroke(#FFFFFF);
}
void draw() {
  ellipse(width/2, height/2, 100, 100);
}
With this, we can make some value within draw() vary each frame. This can be the position of the ellipse. It can assume the position of the cursor:
void setup() {
  size(510, 510);
  background(#333333);
  noFill();
  stroke(#FFFFFF);
}
void draw() {
  ellipse(mouseX, mouseY, 100, 100);
}

Interesting … What about doing this only when the mouse button is pressed? We can use the if(){} conditional and the system variable mousePressed, to dictate when these ellipses are going to be drawn:
void setup() {
  size(510, 510);
  background(#333333);
  noFill();
  stroke(#FFFFFF);
}
void draw() {
  if (mousePressed){
    ellipse(mouseX, mouseY, 100, 100);
  }
}
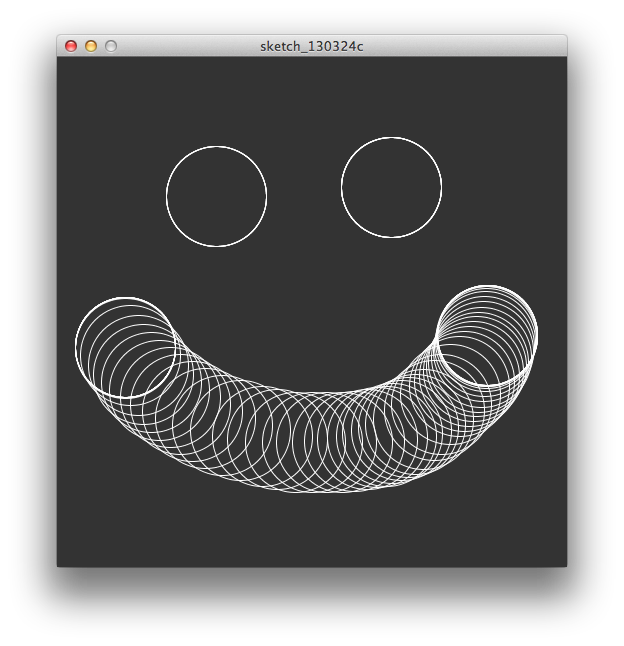
This translates as: every frame, if the mouse button is pressed, draw an ellipse at the cursor position, 100 pixels wide and 100 pixels high.
We can also make the size and the color of the outline of the ellipses drawn vary randomly, and according to the position of the cursor. For this, we have to throw the stroke() function inside the draw, so it changes every frame. We also introduce the random() function, to draw random values for the size of the ellipses. Like this:
void setup() {
  size(510, 510);
  background(#333333);
  noFill();
}
void draw() {
  if (mousePressed) {
    stroke(mouseX/2);
    ellipse(mouseX, mouseY, random(20,80), random(20,80));
  }
}
Here, the value of stroke is a calculation, to respect the accepted values for color (0 to 255). If the cursor is on the far right of the screen, this value will be divided by 2, and return 255 as the color of the outline of the ellipse.
The size of the ellipse is defined by random values (random()), between 20 and 80, for both width and height. So each frame these variable values are recalculated, and a new ellipse is drawn on the screen.
12 lines of code and some scribbles later …

Animating
All these functions and variables like stroke(), ellipse(), mousePressed, mouseX, etc are specific to Processing, and are what make the language ready to be used by those who work with visual structures. Notice that when they are written, the editor marks these words in pink, to say that they are words reserved by the system. But often, we want to define our own variables. I will exemplify with a scenario of an animated circle:
void setup() {
  size(510, 510);
  background(#333333);
  noFill();
  stroke(#FFFFFF);
}
void draw() {
  ellipse(width/2, height/2, 30, 30);
}
I want this ellipse to move 1 pixel to the right each frame. For this, the x position of the ellipse will be incremented by 1 pixel each frame. We need a variable for this.
Think of a variable as a drawer that stores any data. What is inside the drawer can be consulted and changed. In this case, we want a drawer that keeps a numerical value, which will be incremented by one unit each frame, and consulted by the field of the x position of the ellipse.
float posX;
void setup() {
  size(510, 510);
  background(#333333);
  noFill();
  stroke(#FFFFFF);
  posX = width/2;
}
void draw() {
  ellipse(posX, height/2, 30, 30);
  posX = posX + 1;
}
Here, we created the variable posX, which will store the variable value of the x position of the ellipse.
To start, we have to declare the variable, that is, specify the type of data it will contain, and its name. float is a data type specific to the system, meaning floating numerical values (whole and decimal numbers). Other data types in Processing can be int (integer numbers), boolean (true/false), String (sequence of alphanumeric characters, represented between quotes, like names and sentences), etc. In this case, as the x position of the circle could be a whole or decimal number, we’ll use float.
Second, it’s good to define an initial value for this variable. This is done within setup(), which is run once at the program’s initialization.
Then, we say that the value of the x position of the ellipse will be the same value contained in the variable posX. This is done within draw(), which runs in a loop, once per frame.
Lastly, we increment the value of posX by one unit.
Alright, but I don’t want to leave this trail of circles with each processed frame. Just redefine the background() color, inside the draw(). Thus, each frame, the program paints the background over everything and draws the circle in its new position:
float posX;
void setup() {
  size(510, 510);
  background(#333333);
  noFill();
  stroke(#FFFFFF);
  posX = width/2;
}
void draw() {
  background(#333333);
  ellipse(posX, height/2, 30, 30);
  posX = posX + 1;
}
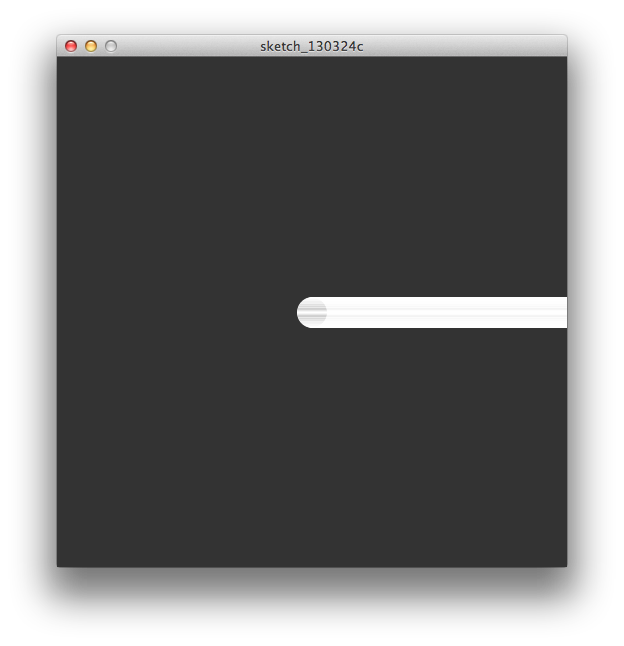
Now, understanding how variables work, we can further enhance this program. Let’s make the x position of the cursor define the speed of the circle. At the same time, let’s make the circle return to the beginning of the screen if it goes out of view:
float posX;
float velX;
void setup() {
  size(510, 510);
  background(#333333);
  noFill();
  stroke(#FFFFFF);
  posX = width/2;
}
void draw() {
  background(#333333);
  velX = mouseX/10;
  ellipse(posX, height/2, 30, 30);
  if (posX > width) {
    posX = 0;
  }
  else {
    posX = posX + velX;
  }
}
Here, we introduced another variable, velX, and defined that it will be the x position of the cursor divided by 10 (to limit the increment of the x position of the ellipse to up to 51px per frame).
We introduced a conditional that will take care of the value of posX like this: If the ellipse is in an x position greater than the width of the screen, put it back at the left of the screen. Otherwise (else{}), increment the x position by the value in the variable velX (defined by the x position of the cursor divided by 10).
This is just to scratch the surface, and doesn’t generate much useful result by itself. But understanding the logic of languages like Processing, we can discover new possibilities through experimentation that pushes study. It’s important to challenge yourself at every step, and with that learn new techniques. Even if what you’re writing doesn’t have practical application, understanding and exercising the concepts of variables, functions, properties, methods, classes, etc. is crucial to dive into any programming language, and Processing is a great gateway for those interested in producing their own visual tools, and leveraging the computer’s processing power.
The computer has become the standard tool of today, but often we forget its ability to process immense quantities of information and perform very complicated calculations in fractions of a second. This can be leveraged to create unique tools and complex and sophisticated graphic pieces, if we know how to speak the machine’s language.
To extend the subject, the Processing website itself is a great reference, with the syntax dictionary, libraries, and tools to create anything, whether for the web, interactive installations, animations, etc. Start there.
Contents: